Llms
LLMs on Ray Serve
Learn to host and serve an LLM chat model using Ray Serve.
import json
from pathlib import Path

import openai
import ray
import requests
import torch
from accelerate import Accelerator
from ray import serve
from starlette.requests import Request
from transformers import pipeline
Hosting and serving a LLM chat model with Ray
Roadmap to serving LLMs with Ray
- Review using a model via API (featuring Anyscale Endpoints)
- Run a model from Huggingface locally (dev/test scenario)
- Introducing Ray Serve
- Serving and scaling LLM chat models with Ray Serve
- Accelerating LLMs on Ray with vLLM and other technologies
Review: Llama-2 on Anyscale Endpoints
As we’ve seen, the easiest way to get started with LLMs is to access them remotely, via API. Top solutions include
- OpenAI API access to proprietary GPT models
- Anyscale Endpoints API access to open models
We’re going to look at a progression from this simple approach to the more challenging tasks of hosting an open model in your own infrastructure, an approach that is popular because
- allows complete control over the application
- requirements and logic
- SLAs/performance
- retains privacy of data supplied to the model
- can be less expensive
Today we’ll work with another similar LLM, and to make the progression clear, we’ll start with a quick review of remote access via Anyscale Endpoints
openaikey = Path('aetoken.txt').read_text()
openai.api_key = openaikey
openai.api_base = 'https://ray-summit-training-jrvwy.cld-kvedzwag2qa8i5bj.s.anyscaleuserdata-staging.com/v1'
model="meta-llama/Llama-2-7b-chat-hf"
system_msg = 'You are a helpful assistant.'
user_msg = 'What is your favorite place to visit in San Francisco?'
response = openai.ChatCompletion.create(model=model, messages=[{"role": "system", "content": system_msg},
{"role": "user", "content": user_msg}])
response.choices[0].message["content"]def quick_chat(user, temp=1.0):
response = openai.ChatCompletion.create(model=model, temperature=temp,
messages=[{"role": "system", "content": 'You are a helpful assistant.'},
{"role": "user", "content": user}])
return response.choices[0].message["content"]quick_chat(user_msg)Locally run a model via Huggingface
The next step in experimenting with models is often to run them locally using the Huggingface Transformers library.
HF Transformers wraps a lot of common boilerplate logic for running LLMs, including
- downloading and locally caching weights and configs
- standardizing the request-response interface
- providing reasonable defaults for typical workflow of generating embeddings, passing them to the model, and decoding the response
By “local” we mean a laptop or desktop with suitable hardware or your own cloud instance.
This workflow is a great way to experiment and to build upon the base models to create more complex applications. For production, we’ll want a more robust environment along several dimensions (e.g., scalability, reliability) – but we’ll come back to that.
Here we’ll set up a minimal script to run the model locally, test it out, and then delete it (and free the memory used on the GPU)
prompt = '''You are a helpful assistant.### User: What is your favorite place to visit in San Francisco? ### Assistant:'''

CHAT_MODEL = 'stabilityai/StableBeluga-7B'
pipe = pipeline("text-generation", model=CHAT_MODEL, model_kwargs={
'torch_dtype':torch.float16,
'device_map':'auto',
"cache_dir": "/mnt/local_storage"})pipe(prompt, max_length=200)del(pipe)
accelerator = Accelerator()
accelerator.free_memory()! nvidia-smiMoving toward production-grade hosting with Ray Serve
To host LLMs in production-quality environments, we’ll want a number of additional capabilities
- Reliability
- Scalability – and preferable auto-scaling since GPUs are expensive
- Integration with other Python libraries and application code
- Access to data at scale
These capabilities are provided by Ray Serve
What is Ray Serve?
Serve is a microservices framework for serving ML – the model serving component of Ray AI Libraries.
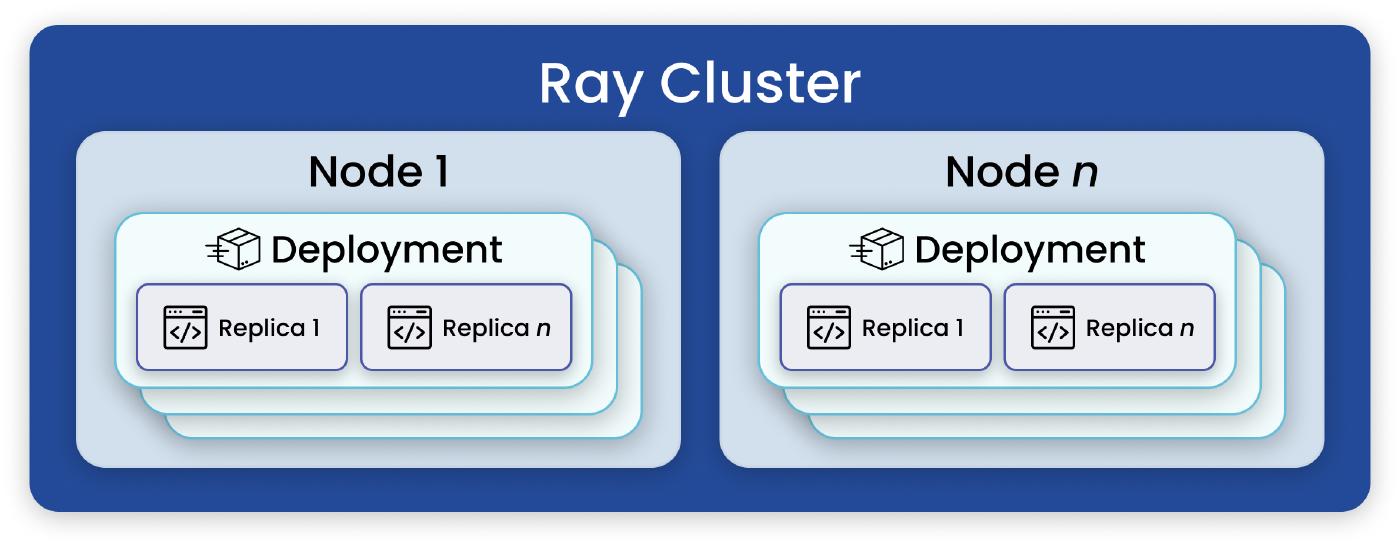
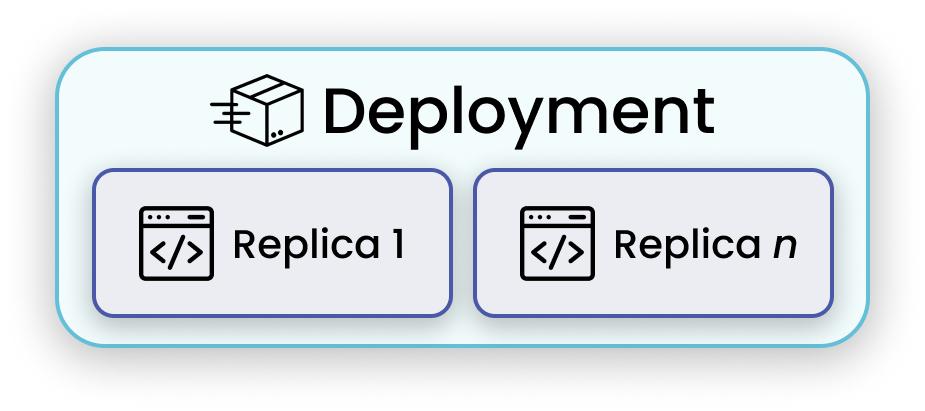
Deployments
Deployment is the fundamental user-facing element of serve.
Our First Service
Let’s jump right in and get something simple up and running on Ray Serve.
@serve.deployment
class Hello:

    def get_response(self, message: str) -> str:
        return "Yes! " + message

handle = serve.run(Hello.bind(), name='hello_world_app')
Code to create and deploy a Deployment (component) with Ray Serve is minimal
We can invoke this service via HTTP if we add one additional method
@serve.deployment
class Hello:

    async def __call__(self, request: Request) -> dict:
        data = await request.json()
        data = json.loads(data)
        return {"result": self.get_response(data['input']) }

    def get_response(self, message: str) -> str:
        return "Yes! " + message

handle = serve.run(Hello.bind(), name='hello_world_app')
sample_json = '{ "input" : "hello" }'
requests.post("http://localhost:8000/", json = sample_json).json()The deployment(s) that accept HTTP connections from the outside world are called “ingress deployments”
For brevity and simplicity, as we explore LLM applications, we will create deployments without HTTP handling. In a complete system, one or more ingress deployments would call functionality in other deployments.
But we can also call into a running deployment directly, for easier dev and testing
handle.get_response.remote('Hello San Francisco!')ref = handle.get_response.remote('Hello San Francisco!')ray.get(ref)serve.delete('hello_world_app')With minimal modification, we can plug the Huggingface model access into a Serve deployment
Note that we guarantee access to a full GPU by annotating the @serve.deployment decorator with a resource requirement: in this case, 1.0 GPUs
Resources can include
num_cpusnum_gpusresourcesdictionary containing custom resources- custom resources are tracked and accounted as symbols (or tags) in order to match actors to workers
Example
@serve.deployment(ray_actor_options={'num_cpus' : 2, 'num_gpus' : 2, resources : {"my_super_accelerator": 1}})
class Demo:
    ...
The purpose of the declarative resource mechanism is to allow Ray to place code on suitable nodes in a heterogeneous cluster without our having know which nodes have which resources to where our code should run.
Best practice: if some nodes have a distinguising feature, mark and request it as a resource, rather than trying to determine which nodes are present and where your code will run.
For more details, see https://docs.ray.io/en/releases-2.6.1/serve/scaling-and-resource-allocation.html#resource-management-cpus-gpus
@serve.deployment(ray_actor_options={"num_gpus": 1.0})
class Chat:
    def __init__(self, model: str):
        self._model =  pipeline("text-generation", model=model, model_kwargs={
                                        'torch_dtype':torch.float16,
                                        'device_map':'auto',
                                        "cache_dir": "/mnt/local_storage"})

    def get_response(self, message: str) -> str:
        return self._model(message, max_length=200)

handle = serve.run(Chat.bind(model=CHAT_MODEL), name='chat')
ref = handle.get_response.remote(prompt)ray.get(ref)That’s it! We’ve got a basic LLM service running on our own Ray cluster!
serve.delete('chat')Scaling and performance
Replicas and autoscaling
Each deployment can have its own resource management and autoscaling configuration, with several options for scaling.
By default – if nothing specified, as in our examples above – the default is a single. We can specify a larger, constant number of replicas in the decorator:
@serve.deployment(num_replicas=3)For autoscaling, instead of num_replicas, we provide an autoscaling_config dictionary. With autoscaling, we can specify a minimum and maximum range for the number of replicas, the initial replica count, a load target, and more.
Here is example of extended configuration – see https://docs.ray.io/en/releases-2.6.1/serve/scaling-and-resource-allocation.html#scaling-and-resource-allocation for more details:
@serve.deployment(
    autoscaling_config={
        'min_replicas': 1,
        'initial_replicas': 2,
        'max_replicas': 5,
        'target_num_ongoing_requests_per_replica': 10,
    }
)
min_replicas can also be set to zero to create a “serverless” style design: in exchange for potentially slower startup, no actors (or their CPU/GPU resources) need to be permanently reserved.
Improving performance
While the qualitative capabilities of LLMs are impressive “out-of-the-box,” we often want to improve them along the performance and efficiency axes for
- cost management
- ability to run on fewer/smaller/cheaper accelerators (or even on CPUs or other devices)
- better user experience
Acceleration techniques
Techniques for accelerating computation and shrinking LLM footprint – particularly with minimally invasive changes to the LLM itself – is a hot area of research, with new approaches published weekly.
Some popular approaches include
- LoRA: Low-Rank Adaptation of Large Language Models
- vLLM: Easy, Fast, and Cheap LLM Serving with PagedAttention
- modeled on virtual memory and paging
- project site
- GPTQ: Accurate Post-Training Quantization for Generative Pre-trained Transformers
- quantizing (fewer bits per weight) withou re-training
- repo https://github.com/IST-DASLab/gptq
- alos see https://github.com/TimDettmers/bitsandbytes
- Faster Transformer
- highly-optimized version of the transformer block; pipelining, converter for distributed inference
- blog https://developer.nvidia.com/blog/accelerated-inference-for-large-transformer-models-using-nvidia-fastertransformer-and-nvidia-triton-inference-server/
- repo https://github.com/NVIDIA/FasterTransformer/
- FlashAttention: Fast and Memory-Efficient Exact Attention with IO-Awareness
… and more!
All of these mechanisms can be combined with Ray Serve to create services that are fast, cheaper, and require less hardware than our example above.
We’ll take a look at deploying our model using vLLM
vLLM
Local usage of vLLM is simple…
from vllm import LLM, SamplingParams

llm = LLM(model='NousResearch/Llama-2-7b-chat-hf', download_dir='/mnt/local_storage')
sp = SamplingParams(max_tokens=200)
llm.generate(prompt, sampling_params = sp)
… as is use in a Serve deployment
@serve.deployment(ray_actor_options={"num_gpus": 1.0})
class AcceleratedChat:
    def __init__(self, model: str):
        from vllm import LLM, SamplingParams
        self._llm = LLM(model=model, download_dir='/mnt/local_storage')
        self._sp = SamplingParams(max_tokens=200)

    def get_response(self, message) -> str:
        return self._llm.generate(message, sampling_params = self._sp)

handle = serve.run(AcceleratedChat.bind(model=CHAT_MODEL), name='accelerated_chat')ray.get(handle.get_response.remote(prompt))It’s straightforward to use but doesn’t seem vastly faster than our earlier example.
vLLM really shines when we have batches of data to process.
cities = ['Atlanta', 'Boston', 'Chicago', 'Vancouver', 'Montreal', 'Toronto', 'Frankfurt', 'Rome', 'Warsaw', 'Cairo', 'Dar Es Salaam', 'Gaborone']
prompts = [f'You are a helpful assistant.### User: What is your favorite place to visit in {city}? ### Assistant:' for city in cities]promptsWe’ll artificially inflate this dataset a bit further
results = ray.get(handle.get_response.remote(prompts + prompts + prompts + prompts))len(results)results[1].outputs[0].textAnd just to verify the outputs are distinct runs of the model
results[13].outputs[0].textWe can see a significant speedup in per-prompt, per-token processing here.
But what if we don’t want to block and process a whole batch at once?
vLLM supports “streamed batching” where we can submit multiple requests over time and still get the benefits of batching. There are more details in this Anyscale blog (https://www.anyscale.com/blog/continuous-batching-llm-inference) and we’ll try it out in a lab exercise.
serve.delete('accelerated_chat')