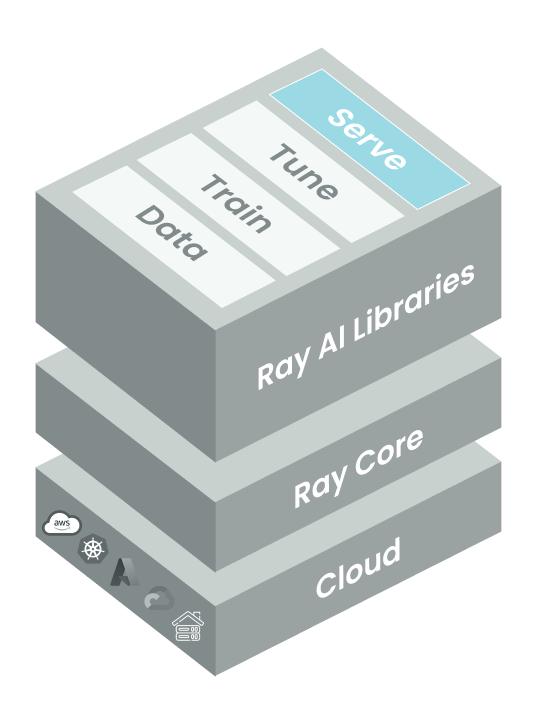
Ray-ai-libraries
Adding Ray Serve for Scalable Deployments
Bridge the gap between development and production by creating a fully deployed, scalable, and efficient serving solution. Deploy your fine-tuned ViT model efficiently with Ray Serve in this notebook.
4. Serving Scalable AI: Deploying Our Fine-Tuned ViT Model with Ray Serve
Milestone 4: Ray Serve for Scalable Deployments
Building a robust, scalable, and efficient deployment pipeline for machine learning models is a crucial step in bringing AI solutions to the real world.
Our journey so far has laid a strong foundation. We’ve fine-tuned our ViT model, optimized our data pipeline, and ensured that our model training scales efficiently. In this installment, we’ll bridge the gap between development and production by deploying our fine-tuned ViT with Ray Serve.
By the end of this notebook, you’ll have a fully deployed, scalable, and efficient serving solution for our fine-tuned ViT model.
Featured Libraries
- Ray Serve
- A scalable model serving library for building complex inference services that scale across multiple machines efficiently and cost-effectively.
- Ray Data
- Ray Train
- Hugging Face
transformers - Hugging Face
datasets
Table of Contents
- Introduction to Ray Serve
- Learn how to scale our deployment and load balance requests efficiently to meet real-world demands.
- Load Components
- Saved model checkpoint
- Featurizer
- Sample image
- Create a Serve Deployment
- Set up Ray Serve to handle model deployment and serving.
- Deploy the ViT Model
- Deploy our fine-tuned ViT model as a scalable API endpoint, making it accessible for inference.
- Send Some Test Traffic
- Test locally
- Test via HTTP
1. Introduction to Ray Serve
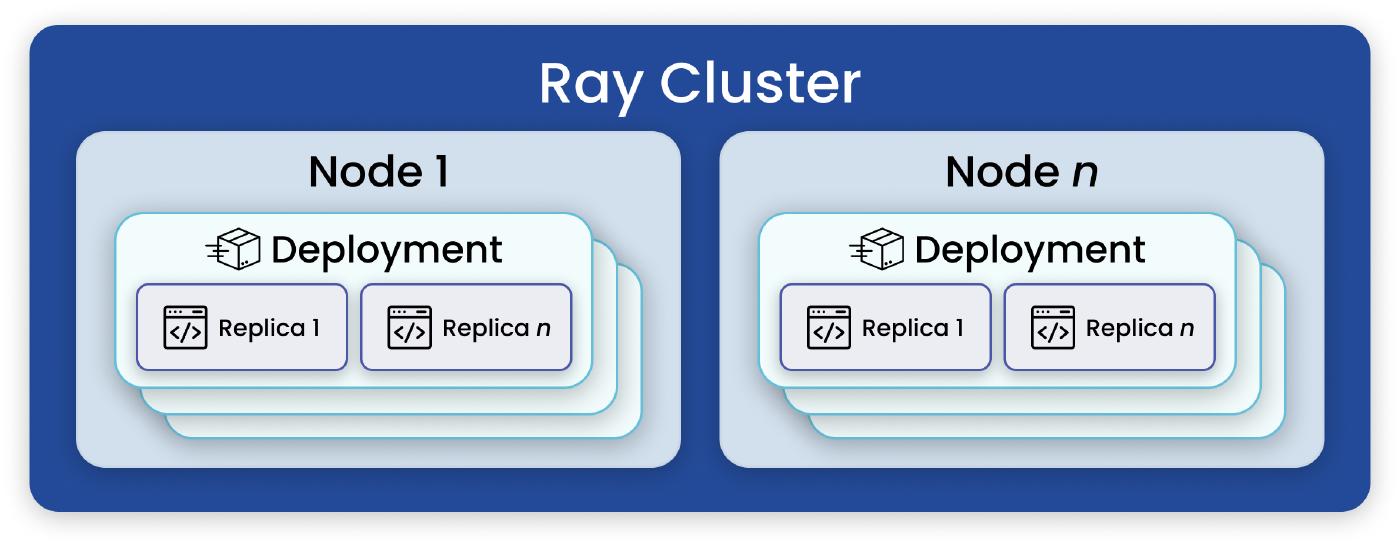
Ray Serve is a scalable model serving library, built on top of Ray, that eases the scaling transition from development to production. Here are some features that define the library:
Scalable Serving: Ray Serve allows us to easily scale our model serving across multiple nodes, handling high request volumes and ensuring low latency.
Flexible Deployment: Ray Serve offers flexibility in deploying models as REST APIs, gRPC services, or Python functions, catering to various deployment needs.
Performance Optimizations for LLMs: Serving large language models offers unique challenges that Serve meets with response streaming, dynamic request batching, multi-node/multi-GPU serving, and more.
Monitoring and Auto-Scaling: It provides monitoring tools and auto-scaling capabilities to ensure the health and performance of our deployed model.
Let’s go ahead and serve our image classifier from the saved checkpoint to see how this composes with the rest of our Ray pipeline.
import numpy as np
import torch
import pickle
from PIL import Image
from transformers import ViTForImageClassification, TrainingArguments, Trainer, ViTImageProcessor

import ray
from ray.train import ScalingConfig, RunConfig

from ray import serve
import requests, json
from starlette.requests import Request
2. Load Components
Let’s start by fetching the minimal set of components we need for our first Ray Serve deployment. These are the fine-tuned model, the featurizer (for transforming incoming images), and some sample image that will act as user traffic.
Load our fine-tuned model
From our user_storage, we’ll be able to fetch a training checkpoint. In this way, we can test inference locally.
saved_model_path = '/mnt/shared_storage/summit_assets/TorchTrainer_2023-09-07_18-09-24/TorchTrainer_59d51_00000_0_2023-09-07_18-09-25/checkpoint_000000/checkpoint'

model = ViTForImageClassification.from_pretrained(saved_model_path)
Load the featurizer
This is the same featurizer that we used to transform data for the initial fine-tuning step.
name = 'google/vit-base-patch16-224-in21k'

feature_extractor = ViTImageProcessor.from_pretrained(name)
Load a sample image
You can choose your own image. For simplicity, let’s select a fish photo from our docs.
image = Image.open("/mnt/shared_storage/summit_assets/fish.png")

image
And then let’s apply the featurizer to the sample image and pass this to the model to ensure that it works as expected.
with torch.no_grad():
    features = feature_extractor(image, return_tensors='pt')
    out = model(features['pixel_values']).logits

out
3. Create a Serve Deployment
Ray Serve abstracts the complexities of building an HTTP server for serving machine learning models. It allows you to define a deployment class, specify initialization logic, and handle incoming requests, making it easier to deploy and serve models in a production environment.
Here’s how a Ray Serve deployment works:
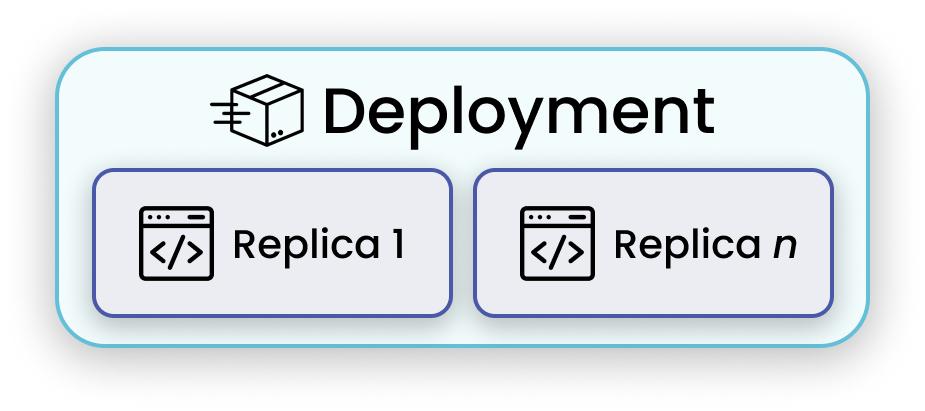
Serve Deployment Class:
- In this code, the
Predictclass is decorated with@serve.deployment. This decorator tells Ray Serve that this class should be deployed as a service, making its methods accessible over HTTP.
- In this code, the
Initialization:
In the constructor (
__init__) of thePredictclass, the necessary components are initialized.self._feature_extractoris a ViT model used for feature extraction from images.self._modelis a ViT model used for image classification..eval()method is called onself._model. This puts the model into evaluation mode, which disables operations like dropout and batch normalization that aren’t needed during inference.
HTTP Request Handling:
The
__call__method in thePredictclass is used to handle incoming HTTP requests to the deployed service.Inside
__call__, the following steps occur:- Asynchronously, it collects the POST request body, which is expected to contain a pickled image.
- It unpickles the serialized image data to obtain the image.
- It then calls the
get_responsemethod to make predictions on the image using the pretrained models. - Finally, it returns the predictions as an HTTP response.
@serve.deployment
class Predict:
    def __init__(self, featurizer_name, model_path):
        self._feature_extractor = ViTImageProcessor.from_pretrained(featurizer_name)
        self._model = ViTForImageClassification.from_pretrained(model_path)
        self._model.eval()

    def get_response(self, image):
        with torch.no_grad():
            inputs = self._feature_extractor(image, return_tensors='pt')
            return self._model(inputs['pixel_values']).logits.numpy()

    async def __call__(self, request: Request):
        import numpy as np
        import io
        from imageio import v3 as iio
        from fastapi import Response

        # async collect POST body
        body = await request.body()

        # unpickle serialized data
        image = pickle.loads(body)

        # invoke existing business logic
        return self.get_response(image)
4. Deploy the ViT Model
- Deployment
In order to actually deploy the service, we must use the .bind method to create an instance of the Predict class with specific configurations. It returns a handle to the deployed service.
- Server Execution
The serve.run function starts the Ray Serve server, which listens for incoming HTTP requests at the specified endpoint (in this case, the name ‘classifier’).
app_handle = serve.run(Predict.bind(featurizer_name='google/vit-base-patch16-224-in21k',
                                   model_path=saved_model_path), name='classifier')
5. Send Some Test Traffic
Let’s see if the core logic works by passing in our sample image directly.
ray.get(app_handle.get_response.remote(image))Now we can test it via HTTP. You can send POST requests to the server’s endpoint with image data. The server will process the image using the ViT models and return the predictions.
response = requests.post("http://localhost:8000/", data = pickle.dumps(image)) # uncompressedresponse.json()Feel free to continue playing around with this deployment. When you’re done, we can use the following cell to terminate any active deployments and free up resources.
serve.shutdown()